I Need You to Run a Print of…
Printing…today it’s mostly a simple process of selecting your file and hitting the “print” button, walking over to the printer and…voila…you have a print! But, before such techno wizardry was the norm, printing required a certain amount of fortitude, confidence, manual dexterity, and a good set of lungs!
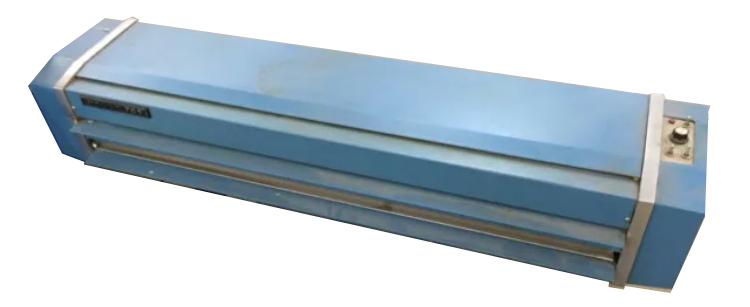
Let me explain. Back in the day, to obtain a “print” of a drawing required the use of something referred to as the “PRINT MACHINE”! This mechanical contrivance (surely coming from the minds of demons) consisted of two parts: the exposure and the developer. Both systems were arranged one on top of the other and each incorporated a set of powered rollers that you would manually feed the media through in order for it to work its magic. Oh, one other thing, and this is where a good set of lungs come into play, it utilized ammonia vapor during the developing process!
How this contrivance worked was basically to expose paper coated with a light sensitive material to a bright light and then to expose the coating to heat and ammonia vapor to turn that coating to something that could be seen. The drawing was placed on top of the light sensitive material and then the light was shown through the drawing onto the material leaving whatever the light could not pass through unexposed. When run through the developer, these unexposed areas would turn a dark blue when in the presence of heat and ammonia vapor. Prints weren’t images of the surface of the drawing but an image through the drawing. How fast or slow the media was fed through the machine determined how light or dark the final product appeared. Most of the time it required the media to be sent through at a fairly rapid pace.
The typical process consisted of the following steps:
- Turn the machine ON and let it warm up.
- Ensure that the proper exposure media is present and in an adequate supply.
- Ensure that the contents of the ammonia bottle are at the proper level, the hoses are connected, and bubbling is taking place!
- Hold breath, ammonia vapors present!
- With the machine warmed up, run a test piece to ensure that the proper exposure speed is set and adjust if necessary.
- Pull out the end of the exposure media and place the drawing on top, ensuring to align the edges of the drawing with the exposure media.
- Hold breath, ammonia vapors present!
- Carefully feed the drawing and exposure media together into the bottom of the exposure rollers (watch those fingers, ties, long hair, and bell bottoms!).
- As the exposed media and drawing come out of the top of the exposure rollers, deftly separate the drawing and exposure media.
- Hold breath, ammonia vapors present!
- Feed the exposed media into the bottom of the developer rollers, while at the same time carefully rolling up the drawing so as to prevent any damage or ripping.
- Observe the developed media for lightness/darkness. Be prepared to adjust the speed accordingly. This may have to take place multiple times!
- Watch for the end of the drawing as it approaches the exposure rollers.
- Hold breath, ammonia vapors present!
- Watch the developed portion of the media as it exits the top of the developer rollers to ensure it rolls up to prevent any damage or ripping.
- When the end of the drawing is observed, grab the tear-off wire and proceed to tear the exposure media while at the same time ensuring the drawing and developed media are not destroying each other.
- Hold breath, ammonia vapors present!
- Once complete, proceed to gather the various items and shut the machine down, unless another victim has been waiting patiently for their turn, then leave the machine on!
- Carefully walk away from the machine. Once at a safe distance, continue normal breathing!
So the next time you need a print of something or are asked to print something, thank your lucky stars you don’t have to deal with the dreaded “PRINT MACHINE”!
Trivia time! We often refer to engineering drawings or copies of engineering drawings as a “blueprint” but this is really a misnomer. The process of obtaining a “blueprint” (where you have a dark blue background with the objects, dimensions, and notes appearing in white) is a somewhat different process and, luckily, one I wasn’t exposed to! The process described here is what would be more accurately referred to as a “blue line” print. The process, albeit cumbersome, was a more rapid and economical way of obtaining a copy of a drawing than the “blueprint” process (at that time anyway).